Wall Cracks 8-17-07 Pete Ramey
This article, along with this one WhiteLineDisease.html doubles as my Wall Flare article.
Most cracks in the hoof wall are present because the hoof walls are not properly attached to the coffin bone and lateral cartilages. The hoof walls simply aren’t strong enough to withstand impact without the backup of well-connected, healthy epidermal and dermal laminae. When competent and frequent (every 4-5 weeks) hoof care begins, the horse will immediately start to grow in well-connected walls. You’ll typically see a tighter, more compact growth originating from the coronet that will march its way to the ground. The previous flared or “bell-shaped” hoof wall will be replaced with straight walls that don’t bend outward as they approach the ground and the cracks grow right out with the new and improved wall growth.
All you need to grow out '90-something'-% of all wall cracks, is the routine trimming of a mustang roll like this wild mare was able to wear for herself.
Careful consideration must be given to the terrain and the sole thickness when deciding whether to trim the wall passive to the sole, to trim the wall level with the sole, or to leave wall sticking up longer than the sole (either way, you should place the same bevel on the entire width of the wall. If the sole is thin and/or the footing is hard, I lean toward leaving wall standing longer than the sole. If the sole is 5/8"-thick and/or the ground is soft, I lean toward leaving the wall level with, or slightly passive to the sole. As always, be prepared to use boots with padded insoles or Equicasts as needed for comfort and protection during this process. Read http://www.hoofrehab.com/HorsesSole.html for important details and to learn how to estimate the sole thickness.
The “magic bullets” for growing out most wall cracks are simply a well-shaped “Mustang Roll” (I prefer a straight bevel or chamfer around the perimeter of the outer wall on a 45-60 degree angle from the ground, rather than a rounded shape) and enough time to grow them out. So to discuss wall cracks, we really just need to focus on the exceptions to this - the things that can throw a big wrench into this otherwise simple process.
Here they are:
Diet
At the heart of almost every flared or disconnected wall is a nutritional problem. Sometimes the result of this is a deep, nasty groove where the white line is supposed to be. Sometimes, however, this groove is filled in with lamellar wedge (keratin cells expressed between the separated dermal and epidermal laminae). Other times, the sole might be stretched or distorted with the wall flare - the white line can appear perfectly normal at ground level. Either way, the hoof wall will flare outward as it approaches ground level. Lay a straight edge against the wall vertically, anywhere around the circumference and if it doesn’t touch the wall from top to bottom, separation from P3 and or the lateral cartilage is present.
Other signs that the diet is working against you are rows of ripples and/or red stripes lined up in succession down the outer wall. Any inflammation or change can throw a ripple or red stripe on the hoof wall, but typically if you see a continuous series of them lined up down the wall you can safely assume the horse is in a constant state of dietary distress. Obese horses, underweight horses, skin or hair problems… All products of improper diet and will almost always accompany hoof problems. The skin (the hoof wall is literally specialized skin) is the first thing the body robs and starves when trying to save the more vital organs in the face of nutritional distress or disease. The hooves are truly our best window into the health of the whole horse; inversely, they are the first thing to noticeably “screw up” in the face of trouble. It is critical that horse owners understand this, because when dietary problems are affecting the hooves, they are also compromising energy levels, condition, recovery, performance, attitude, immune systems, bone density, ligament and tendon integrity, all connective tissue, healing... The entire health and well-being of the horse.
If the diet is constantly weakening the laminae, you’ll never completely succeed in growing in well-connected hoof walls, and thus the cracks in the walls will be stubborn as well. Usually carbohydrate overload is the culprit (or better yet, the horse doesn’t get enough exercise to burn the sugars he consumes). The grains/feeds we were taught to provide are usually over 60% sugar. Cultivated pasture can fluctuate to over 30% sugar - same with our hay (study
www.safergrass.org). From a natural standpoint, we not only decrease captive horses' movement, but we almost always bathe them in sugar overload. The body raises insulin levels to deal with this excess, and the high insulin levels destroy the integrity of the laminae. [Asplin K.E., et al., Induction of Laminitis by Prolonged Hyperinsulinaemia… , The Veterinary Journal (2007) doi: 10.1016/ j.tvjl.2007.07.003] (The most important laminitis paper of the century in my opinion). Read http://www.hoofrehab.com/LaminitisUpdate.html.Additionally a lack of minerals in the horse’s diet, or worse; an excess of certain minerals can constantly weaken the laminae. Forage testing is often necessary for stubborn cases. This can get really complicated or be really simple, depending on the situation. This journey of discovery began for me with three separate pastures in my clientele that I just couldn’t grow a foot on. Finally, I tested the grass, and found there was no copper or zinc in the horses’ world. Both are known to be important for fighting inflammation and for skin (again, read ‘hooves’). I corrected that simple problem and grew in well-connected walls and grew out the wall cracks in one straight growth cycle from top to bottom. I was hooked forever. Read
http://www.hoofrehab.com/Diet.html for detailed instructions.This simple solution worked. Sometimes a grazing muzzle or an increase in exercise is all it takes. But sometimes you may need an equine nutritionist to take you farther with sweeping dietary changes. Do I do this for every horse? No, but it is the first thing I try when I find myself “spinning my wheels” with a horse’s wall connection (or if I see the writing on the wall to begin with) and it pays off.
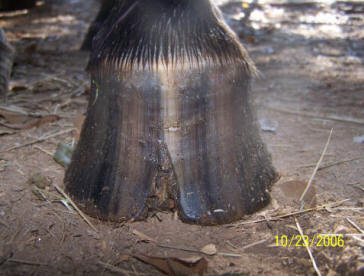
"Writing on the wall" (pun intended)
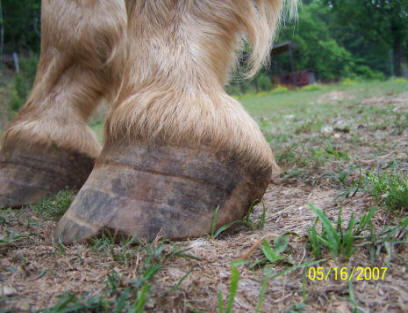
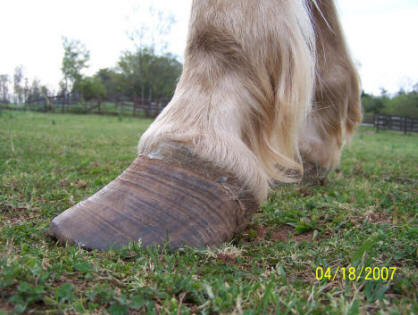
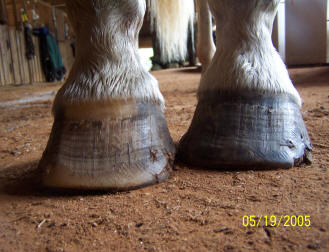
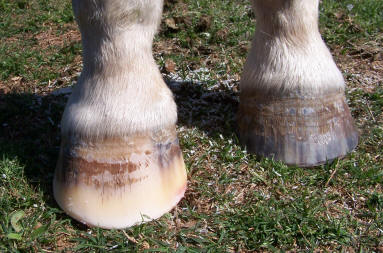
Ripples, grooves and red stripes lined up down the hoof wall. Wall flare or outward deviation or bell shape. Reason for true panic if you see this on your horse. Also note the chunk broken off at ground level in the horse in the left photo. The top of it is parallel to the growth lines. Any time you see a crack that parallels the growth lines, It is either an old abscess that broke thru at the coronet, or an impact that occurred at the coronet. Either way, the crack grew all the way down from the top, and will eventually break off like the one above obviously did.
Trim Frequency
When walls overgrow they are supposed to flare. This is an important defense mechanism at work. The alternative would be neglected horses running around on stilts and breaking their legs. In most environments, it is time to trim when the wall gets more than ¼-inch above the callused sole plane and/or BEFORE any additional flaring or separation occurs. If you are trying to grow out flared walls and accompanying wall cracks, this is particularly crucial. When the wall is well-connected and intact, it is very strong, but a compromised situation is very unforgiving to neglect. Even a four week trim schedule can be too long on the worst cases, and allowing overgrowth or separation between farrier visits will cause a ‘three steps forward, two steps back’ type of progress at best.
Peripheral Loading
The hoof wall was never intended to carry the horse’s weight alone. The laminae are strong, but a peripherally loaded hoof leaves the entire impact force literally hanging from the lamellar attachment. It simply isn’t strong enough for that - never was. The sole, bars, frog and walls are supposed to be all working together as a team to support the horse.
Any trimming or shoeing method that forces peripheral loading will utterly prevent the growing in of well-attached walls and thus prevent the growing out of wall cracks. Strong words but very true.
In fact it is my firm opinion that the sole is supposed to be the primary ‘vertical supporter’ of the horse. Caution, though - the sole grows and thrives the best under constant pressure and release but like any tissue, abhors constant pressure, so I do not think it would be possible to apply this concept to a shoeing method. When you shoe with sole pressure (with any amount capable of true support), this pressure is clamped on, to an extent, and will damage the sole’s corium, because the pressure doesn't fully release when the foot is in flight. This is why I’m confident that even for horses that are to be shod again, the very best way to grow out wall cracks is to provide them with a barefoot period to grow in well-attached walls.
Diet x Trimming x Elimination of peripheral loading = Healthier situation
Toe-First Impact
No matter how you trim, shoe or treat the walls you won’t completely grow in well-connected walls or grow out wall cracks on a horse that impacts the ground toe-first. Heel-first impact must be a top priority for any hoof care program. This is how horses naturally move, so the way to accomplish heel-first impact is simply ‘not to allow the prevention of it.’
From a trimming standpoint this means careful consideration of breakover and heel height. First, be sure you don’t trim the heels so low that you cause sensitivity, and thus a compensative toe first-impact. Generally speaking, I trim heels as low as possible without:
1) Causing sensitivity, thus toe-first compensation.
2) Invading the healthy 1/2-3/4-inch thick callused sole plane - at all - EVER.
Pretty simple to say, but accomplishing these goals in the real world takes finesse and experience. Even then, you’ll go too far on an occasional horse and cause heel sensitivity or toe-first compensation. Just be sure you’re paying attention and don’t do it to the same horse again. Watch the horse move before and after trimming and more importantly, read the wear pattern in the bare hoof or shoe. A horse that is moving correctly will wear the shoe or hoof evenly all the way around. A hoof or shoe that is landing toe-first will wear more at the toe. The reason this is more accurate than watching the horse move, is that in the wear pattern you see the horse’s whole world, not just the moment you lead him out and the terrain you choose to lead him on.
Read
http://www.hoofrehab.com/HeelHeight.html for important details.The toes can also prevent heel-first impact. If the walls are separated from P3, there are usually keratin cells piled between the dermal and epidermal laminae (lamellar wedge). At ground level this can look like sole, but x-rays, or usually closer inspection will reveal a distinct difference between lamellar wedge and sole at ground level. Usually in these cases you’ll see the “footprint” of P3 on the bottom of the foot, with everything outside that “footprint” being lamellar wedge. Unless the sole is thin (less than 1/2-inch) it is important to relieve the pressure on that lamellar wedge at ground level with a slight (15-20 degree) bevel or “rocker” that begins ¼-inch outside the true sole. Don’t cut sole; just lamellar wedge. Read
http://www.hoofrehab.com/Breakover.html for important details and exceptions.This is important to heel-first impact, because of the laws of hoof flight. Much like throwing a baseball, if the hoof leaves the ground vertically (as it must to step over a stretched-forward toe) it will travel higher, but won’t fly very far. The resulting short stride forces a toe-first impact because there is not enough limb extension. If you can get the effective breakover back where it would be if the walls were well-connected, the foot can stay on the ground longer, thus leave the ground at a lower angle and thus will fly farther. The result is a longer stride, and unless the heels are sore, the horse will land heel-first.
If the horse is sensitive in the back of the foot due to underdeveloped lateral cartilages, underdeveloped digital cushions, thrush, etc. or if the soles are thin or if the terrain is hard, fit the horse in hoof boots with padded insoles. If this provides proper movement, exercise them this way as much as possible. A pea gravel loafing area is a magical addition for these horses as well. Read
http://www.hoofrehab.com/GloveMod.html and http://www.hoofrehab.com/BootArticle.htm for details.
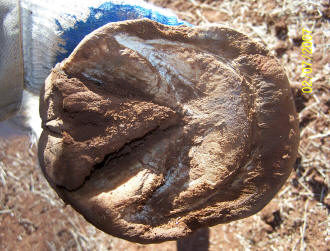
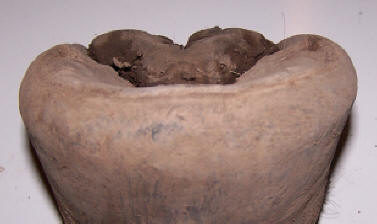
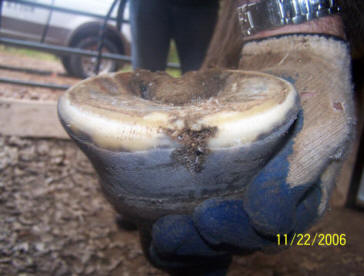
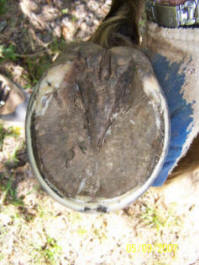
Telltale "hump" or "footprint" of P3 on the bottom of the foot. The material behind the hump is generally sole. The material between the hump and the wall is lamellar wedge. If you see this on your horse: I'll put this gently - Panic. It's time for sweeping dietary changes and improved hoof care.
Another important tool for growing out wall cracks: Equicasts. These are particularly useful when a crack spits all the way up into the coronet and instability results, with the two sections of wall moving at the coronet on loading. These walls will have to be completely unloaded at ground-level for correct regrowth to be possible. This puts tremendous pressure on the sole, which can be dangerous. The Equicasts - a specialized casting material wrapped below the hairline - can protect the sole while simultaneously stabilizing the crack long enough for new, correct growth to begin. Read
http://www.hoofrehab.com/Hoofcast.html for important details.Fungal Complications
Fungi don’t usually bother healthy hooves, but let them get established in a wall crack and they can eat their way upward faster than the horse can grow healthy hoof down. This effect should be suspected any time a crack acts “stubborn” about growing out. When I suspect this, I put my customers on an anti-fungal soaking program. No topical solution well help at all. You just have to soak, or you'll be looking at those same cracks in ten years.
My favorite antifungal treatments are activated and diluted Oxine AH,White Lightning, Clean Trax, and 30-minute 50/50 apple cider vinegar (ACV)/water solutions (note: each of these can irritate the skin of isolated horses - start gradually and pay attention. Don't mix any of them stronger than the directions). For horses with sensitive skin, the Oxine, White Lightening and Clean trax can be used with just a small amount in the bottom of a plastic bag with the top of the bag taped tightly around the horse's leg at mid-cannon. The gas emitted from the solutions is effective at disinfecting the foot without a need to soak above the hairline. Thoroughly rinse the leg after soaking.
Oxine AH Directions: Activate 4 ounces of Oxine AH with either 4 ounces of white vinegar or one teaspoon of citric acid. Wait until soultion activates/turns yellow, then dilute with one gallon of water. Do a 20 minute soak, 1-2 times per week - more detailed directions here.]
I can’t help mentioning, that I often use Lysol Concentrate mixed precisely to the directions for cleaning a bathroom floor (no stronger). I shouldn’t mention it because it is inconsistent with the labeling, but I’ve used it on hundreds of horses and have never seen or heard of a negative effect. Like the ACV soaks, I think that one reason it is so effective is that it's cheap enough that people will actually repeat it over and over, rather than the "one or two chances" they'll typically give a more expensive product. It makes a soapy water that kills fungus, yeast and bacteria without harming living tissue or drying out the skin or hooves. Elegantly simple and it works. I typically have my customers use soaking boots to soak the hooves 3-4 times a week for 30 minutes. I use it for wall cracks, white line disease and thrush.
Additionally, when you see horses with multiple superficial cracks all over the hoof wall, fungus is usually the culprit. It is important to realize this because many people mistake this for dry feet and put oil on the hooves. This seals the fungi into a dark, wet, anaerobic environment and maximizes their “horse-eating” capabilities. Constant changes from wet to dry contribute to this, so drying up the environment is the best cure. If I can open the superficial cracks without excessively thinning the wall, I often will.
Also, there is an important dietary consideration here as well. If a horse is missing something, he’ll provide it to the more vital organs first, the skin gets the leftovers. So any dietary problem will make a horse’s hoof horn weaker and more susceptible to this kind of fungal attack.
Coronary Scarring
Occasionally, a crack will go so high it splits and damages the coronet. Also, an impact trauma or severe cut can damage the coronet. Either way, this can lead to scar tissue and a permanent weakness or even a true gap in the hoof wall growth. This is usually just a cosmetic flaw. It doesn’t hurt a thing, except it can create an entry point for fungus, which can then eat a larger crack and spread the damage to a large area.
When I see this occurring I usually put the owner on a “once a week forever” anti-fungal soak to keep the infection from getting re-established and instruct them to try not to look at the crack.
Lamellar Damage
A very similar story can happen to the dermal and/or epidermal laminae as well. An old wall crack can damage the laminae, a benign tumor or a keratoma can disrupt growth, a deformity or an adaptive change in the coffin bone can leave a gap in the laminae. The natural crena or cleft at the center of the coffin bone is over exaggerated in some horses - most commonly, it seems, in draft stock. This can also leave a gap in the laminae (If you see a horse with multiple, dead-center toe cracks you can count on this one; look for the tell-tale ‘divot’ in the sole, mirroring the ‘notched’ shape of the coffin bone.
The end result to all these (and more) is that sometimes there is a missing laminae or two on some horses - a little hole in the "white line." Like the coronary scarring, it is usually not a big deal except that it can be another entry point for fungus, which often spreads the damage to the other laminae and the hoof wall. Again, in these cases I usually use an anti-fungal soaking routine to help me grow out the cracks and separation, and then put the customer on a “once a week forever” anti-fungal soak to keep the big problems from coming back. This is a good idea when any permanent ‘hole’ is present.
That is all the ammo I need and I very rarely have trouble growing out a wall crack. I hope this helps your horses.
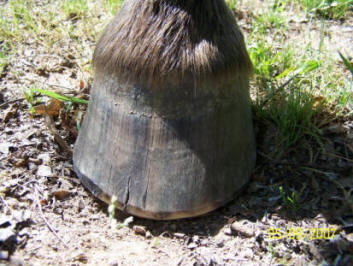
6 months with the front left foot on a long-term hard case with just about everything in this article going on at once.
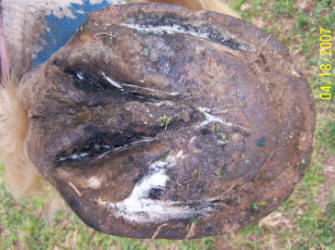
At the setup trim in October, severe flaring/wall separation was present. The deep hole warns about fungal complications and a need for soaking. Coronary scarring is present from a time in the past when the crack made it to the coronet. You can see the rippled and separated walls, plus the presence of lamellar wedge in front of the true sole, suggesting dietary problems.
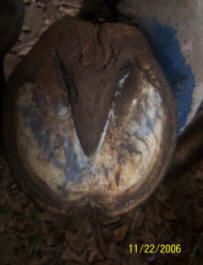
As usual with center toe cracks, you see the 'divot' in the sole mirroring an exagerated crena or cleft in P3. This has been an entry point for infection, and the primary reason these cracks persisted for so many years, through several different farriers. Most likely, if the owner stops her weekly anti-fungal soak the deep, infected holes and accompanying cracks will return (sorry, I added that as a personal note to her ;-).
And finally by May, the cracks are all but gone. The coronary scarring/weakness will always be present, but proper management can keep it from being a problem for the horse.