Understanding the Horse's Sole 8-16-05 Pete Ramey
The sole of the
foot is the most abused and misunderstood part of the domestic
horse (with the possible exception of its digestive system).
I’ve been guilty of it, too. As a horseshoer it always seemed
necessary for me to routinely cut the sole at the toe, and in my
early days as a barefoot trimmer I thought it was desirable to
thin it at the back of the foot. When I began both professions,
I was taught to view the sole as an idle passenger; trimming the
hoof wall to certain parameters and then trimming or relieving
the sole to match. Now I see the sole as the ultimate guide for
hoof trimming; keeping the heels, bars and quarter walls
1/16-1/4 inch above the natural callused sole plane. (See
http://www.hoofrehab.com/HeelHeight.html for exceptions.) When I think back on the
past and compare it to my results now, I shudder at the
comparison. My own learning curve has been a long one. I hope to
shorten it for you, here.
It is a confusing
subject, though. It can be difficult to distinguish between
healthy sole that should be preserved, false sole that should be
removed, false sole that needs to stay around as long as
possible because the new sole underneath is immature, shedding
sole that needs to be removed because fungal infection
underneath is eating away at the new sole that is trying to
grow, unsupported sole under flared walls that needs to have
pressure relief………….. The list goes on, and it seems the more
you learn, the less you may understand what needs to be done.
Since the sole is the first line of defense between the horse
and the ground, its proper management is crucial to soundness.
Luckily we have a very reliable guide. The seams between the
sole and frog – the collateral grooves – are the most reliable
and important guide we have for determining the needs of the
foot. A full understanding of their significance and the
information they offer will give you “x-ray vision” when you
look at almost every hoof.

Let’s start with the
foundation. When viewed from the side, a naturally shaped hoof
should have an arch from front to back much like the arch of
your own foot. The coffin bone shapes the front half of the foot
and in a standing horse, should thus mirror the front half of
the arch, or be elevated slightly in the back. The lateral
cartilages form the foundation for the back half of the foot,
but with more flexibility.
During normal
locomotion, the horse should load the initial impact force on
the more flexible back of the foot giving the horse an
incredible ability to dissipate energy. Much like the rubber
tires on your car, this flexibility immediately reduces the
amount of shock that must be dissipated by the rest of the
system.
As the foot reaches
maximum load, the arch is pressed flat, giving a ground parallel
orientation to the coffin bone and to the lateral cartilages.
Then, the horse lifts the heels as the stride is completed,
leaving the rigid front half of the foot the tremendous job of
driving the horse forward.
The underside of the
coffin bone and the lateral cartilages are vaulted like a dome.
Looking at this dome from the bottom gives you the impression
you are looking into a bowl and the corium that grows the sole
of the horse is attached to and grows from this foundation.
According to measurements taken from wild hooves and healthy
domestic hooves the sole should be 5/8- to 3/4-inch thick and
uniformly cover the vaulted underside of the lateral cartilages
and the coffin bone. This is not something we have to do for the
horse. It will take this shape naturally if the horse gets
plenty of movement on its bare hooves. We must allow this sole
to callus into very dense material if it is to be expected to do
its job of protecting the underside of the horse. Its surface
area is huge when compared to that of the hoof wall’s ground
surface, so it is actually the sole that is bearing the lion
share of the horse's weight (on any yielding surface, this is
true, whether the hoof wall is 1/8-inch shorter than or 3/8-inch
longer than the sole).
The sole was
designed for this, though, and generally does this job very well
as long as humans don’t come along and routinely thin it.
Personally, I can run very comfortably on gravel while barefoot,
but I know I could not even walk on grass if someone were
constantly cutting the soles from my feet; even if they only did
it in one tiny spot and left the rest of my callous intact. A
broken bottle retaught me this lesson on a recent family camping
trip. I had plenty of calloused areas left on my feet, but the
dime-sized area I lost made my own boots seem like “too little,
too late.” I was basically lame for a week, and a month later,
I’m still not “gravel crunching” without my "hoof boots."
Soles of horses and
humans can be regrown very quickly, but callused sole is another
story. Callused sole is simply a huge amount of sole material
packed into a thinner space. It takes time to build adequate
callus. So should we just leave horse soles alone and let them
callus and build at will? Usually yes, it’s just that simple-
leave the darn sole alone. There are exceptions and
this muddies the water, though. When a shoe has been on a horse
or if it has been stall bound, the sole can build into thick
layers. Domestic donkeys and minis tend to grow too much sole no
matter how much they move on our soft pastures. Sub-solar
abscessing can leave large false soles in its wake. In arid
environments, the sole may never exfoliate on its own. Sometimes
we do need to trim away this excess to allow hoof function and
normal callusing of the real sole.
How do we tell the
difference? How do we know when we have adequate thickness,
excess thickness, or not enough? Easy. Nature gave us a
trustworthy guide in the collateral grooves. If we learn to read
them, we will never have to wonder what needs to be done or not
done to the bottom of the foot. The very special thing about the
collateral grooves is that they are very consistent in their
depth to the underlying inner structures. If you take cross
sections of a cadaver hoof, you’ll find that it is about
7/16-inch (9mm) from the bottom of each groove to the sensitive
corium -- whether the rest of the sole is too thick or too thin.
This means that if a horse has too much sole at the outer
periphery, the collateral grooves will be too deep. If there is
not enough sole thickness at the outer periphery, the collateral grooves will be too
shallow. To my knowledge, only a sub-solar
abscess can push the grooves farther from the coffin bone, and
deep, thrush-like infections are the only condition that causes
them to become closer to the corium.

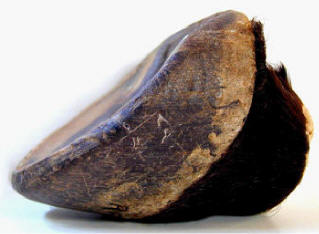
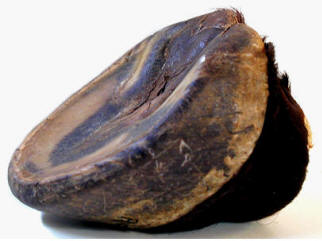
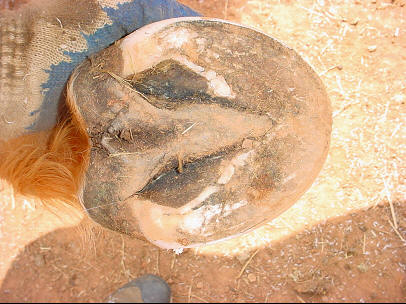
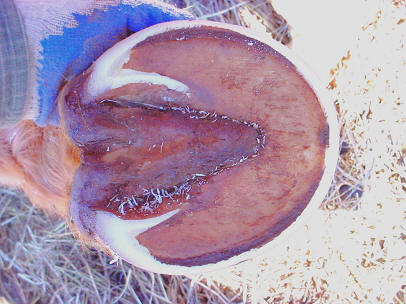
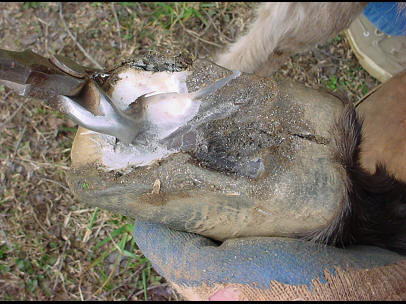
Above, are two
flat feet with very different needs – at first glance, the
only difference between the two might be the collateral groove
depths. The hoof on the left needs an aggressive trim, and the
hoof on the right needs the entire bottom of the foot left
completely alone. All we have to do is understand how deep the
grooves are naturally, and we will immediately be able to tell
if the inner structures are too close to the outdoors or too far
away. This applies to the front of the foot and to the back. I
can’t put exact dimensions to this, because different coffin
bones have different amounts of solar concavity, and of course
it varies by hoof size (though not much). A little bit too much
sole bothers horses far less than having too little, so I tend
to begin by erring on the side of caution. Wild hooves and
healthy domestic hooves with uniform sole thickness tend to have
their collateral grooves (at the deepest part) about ¾” off the
ground at the apex of the frog, and about an inch off the ground
toward deepest point beside the bars. These measurements can be
taken by laying a rasp across the foot and measuring down to the
bottom of the groove.
If this measurement
is ¼” deep at the apex of the frog, you can very safely assume
that there is not enough sole between the coffin bone, its
sensitive corium, and the outdoors. It must be allowed to build.
If this measurement is 1 ½” deep, you can very safely assume
material could be removed. The same exact logic applies to the
back of the foot as well – the back of the foot needs 1/4”-1/2”
more depth than at the apex of the frog to provide a 3-5 degree
positive palmar angle.
These
measurements are far more critical to the horse than toe length
or heel height measurements based on the highly mobile
coronet/hairline (read
http://www.hoofrehab.com/Coronet.html ). The coffin bone and lateral cartilages often
descend into a lower position in the hoof capsule and this
yields a hoof capsule that is longer than natural. This is
unhealthy, of course, but trimmers and farriers who ignore this
fact and trim to heel or toe length dimensions add insult to
injury by overexposing the nerves in the corium on the bottom of
the foot. Thinning the sole tends to cause the inner structures
to move lower and lower, lengthening the overall hoof capsule.
The flip side of this, is that allowing the sole to build and
callus at optimum thickness drives the inner structures upward
(read
http://www.hoofrehab.com/DistalDescent.htm ).
The coronet moves down the skeleton, shortening the hoof capsule
to natural proportions as the callus builds. The center and
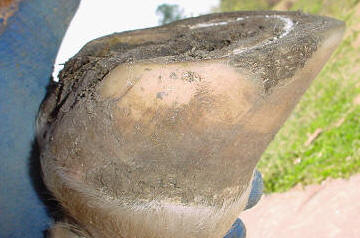
right pictures below show the natural sole thickness and
concavity of a wild horse's foot. Read
http://www.hoofrehab.com/Seasons.html
for the exceptions to the need for a
deeply concaved sole.

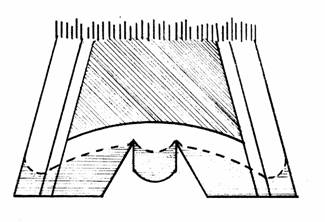
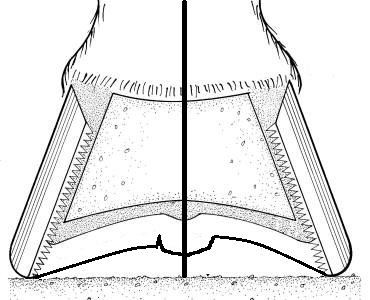
In the drawing above
left; you can see our goal when we are faced with a shallow
collateral groove. The left side of the pictures show how we
turn the flat foot with shallow collateral grooves into a
concaved foot by building adequate sole thickness. The right
side of the picture shows the common mistake of trying to carve
out solar concavity; thinning an area that is already too thin.
We will build solar concavity as we build sole thickness.
Contrary to the way the picture must be drawn, the hoof
generally does not lengthen during this process. The coffin bone
and lateral cartilages are pushed upward (relative to the
hairline) as the sole builds, keeping the hoof capsule the same
length or often dramatically shortening it. Burn this drawing
into your brain and give it a lot of thought – if you are a hoof
care provider, it may be the most important thing you ever see.
If the sole-building
process is only partially complete, you will see a flat spot
adjacent to the white line and a concaved shape to the area of
callused sole closer to the frog. This flat area reliably shows
you where the sole is still too thin. It is very important to
note that as the horse tries to build this natural sole
thickness, it will often prioritize key areas where the sole
thickness is needed the most. The result will be "lumps or
bumps" on the flat area or along the sides of the frog. Many
trimmers routinely trim away these bumps; working against the
horse's attempts to build adequate solar concavity. You must
visualize the natural flow of the individual horse's solar
concavity and determine if that flow goes all the way out to the
white line, without going flat, anywhere.
That lump may be the only correct spot on the whole foot. If it
falls within the "imaginary bowl" of natural concavity, you
should leave it and hope it spreads over the rest of the sole.
To visualize proper sole thickness using the collateral grooves, use the wild hooves or a healthy domestic hoof with adequate sole thickness. Think of the collateral groove as the bottom of a bowl, and natural solar concavity flows up and out from there. Anything sticking above this bowl should probably be removed. Any area below this bowl should be left alone and allowed to grow. Misunderstanding this is where people tend to hurt horses. Again, when the bowl isn’t deep enough, there is not enough sole at the outer periphery. There will be a flat spot in the sole in the outer perimeter touching the white line. You’ll generally see the flow of the natural concavity making its way out from the frog, but then it will flatten out where it is too thin. Study the previous line drawings if this is still not crystal clear.
Note:
When P3 has become remodeled, losing mass at its outer
periphery, the sole can be of uniform and adequate thickness and
still be flat at the outer periphery because it mirrors this
shape of the bone. The collateral groove depth at the apex of
the frog will be shallow in these horses as well, even with
adequate sole thickness. If a horse
seems to have difficulty growing sole, examine the sole
thickness and the shape/mass of P3 on a lateral radiograph.
These horses will usually have a
permanent reduced capacity to grow sole. Optimize the diet (http://www.hoofrehab.com/Diet.html), use
exercise in boots with padded insoles (http://www.hoofrehab.com/bootarticle.htm
and
http://www.hoofrehab.com/GloveMod.html),
grow out all wall flares (http://www.hoofrehab.com/WhiteLineDisease.html), and let the horse spend
loafing time in deep beds of pea gravel to stimulate sole
growth. Use
www.hoofarmor.com
applications or
www.Equicast.com
to eliminate external wear during the
sole-building process.
In the beginning, we don't know exactly how much concavity is needed by the individual horse, so to be on the safe side, assume it should be 3/4" (18mm) at the front and 1" (25mm) deep at the deepest point beside the bars. These measurements are toward the maximum you will commonly find, and always a good place to start. After we build some depth, the shape of the horse's natural solar concavity will start to emerge and we shift to trusting that shape.
Note: When heels are contracted, the lateral cartilages will be bent up into a higher arch. This yields collateral groove depths that will exceed 1” with the same target 1/2”-3/4” sole thickness. In these cases, trusting the callused sole plane is more accurate that dictating a specific collateral groove depth. Also, for additional important heel height variables, read http://www.hoofrehab.com/HeelHeight.html.
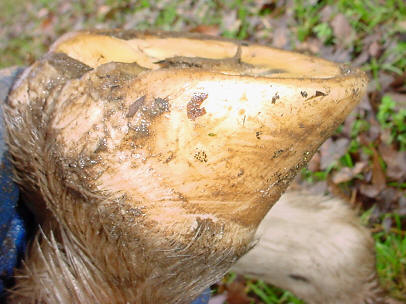
The hoof above
almost has complete sole thickness, but you can see a slight
flattened area in the sole at the toe, indicating that a little
more depth could be built there. Too many trimmers tend to cut
concavity into this flat region, thinning an area that is
already too thin. The result, again, is a flatter foot as the
undermined coffin bone is free to migrate downward under the
horse's weight. Concavity must be built up, and cannot be cut
in.
In Jaime Jackson's
wild hoof specimens (above), the collateral groove at the apex
is only 1/2" deep within the solar concavity. If this were a
domestic horse in our care we would know that natural sole
thickness has been achieved because there is no flat spot
adjacent to the white line at any part of the sole. This natural
shape of the callused sole over-rides our original ¾-inch
"starting guess," whether it turns out to be deeper or
shallower. If only these principles were more widely
understood......
I personally see
more horses lamed by the farrier’s rasp than by every other
means combined. I would love to see a rasp designed to deliver a
strong electric shock to its handler if it gets closer than
5/8-inch away from the bottom of any collateral groove for any
reason. A hoof knife that shocks its handler
if it gets closer than 3/4-inch away from a coffin bone or
lateral cartilage would be nice as well. I would spend my very
last dime, buying them and distributing them all over the world.
There is no excuse for such a blatant misunderstanding of the
foot. Most subsolar abscesses and EVERY coffin bone sole
penetration I have ever seen came along in the wake of previous
trimming away of the sole material under the coffin bone or
lateral cartilages. This is a strong statement, I know, but
painfully true.
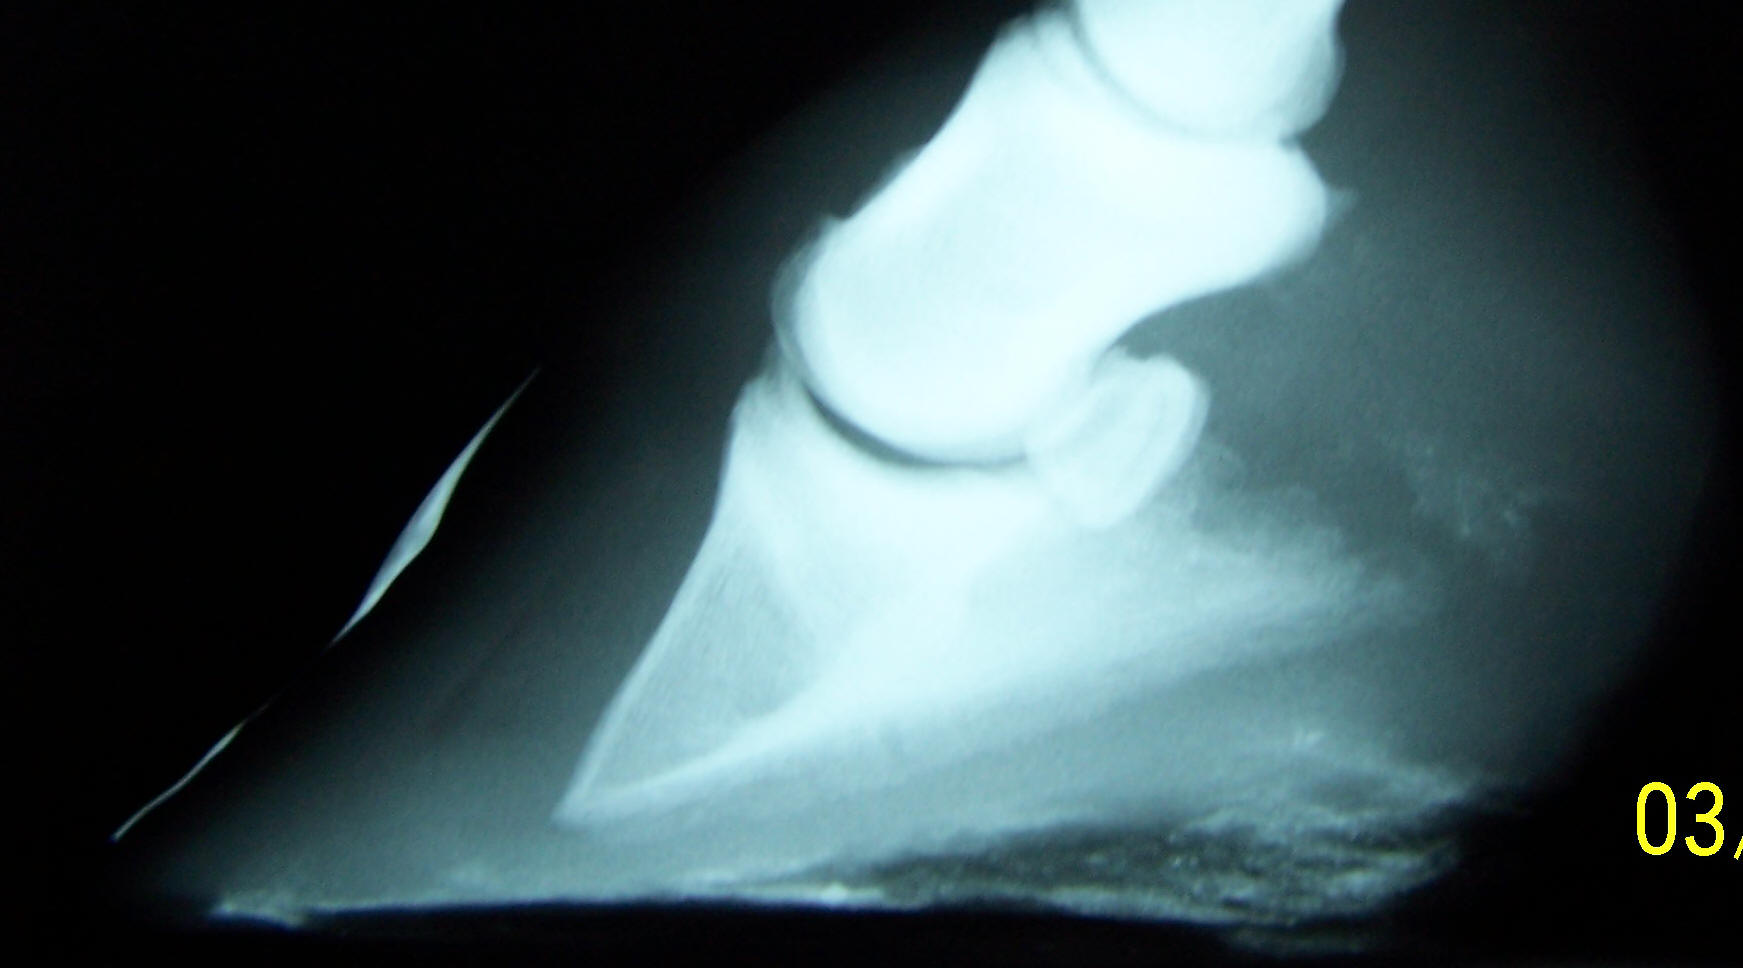
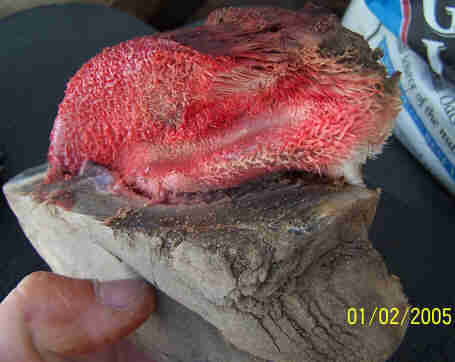
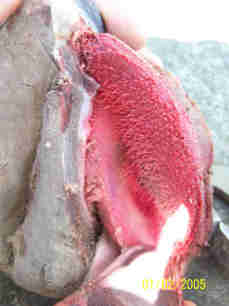
The corium
surrounding the tip of P3 in the above radiograph was exposed to
the outdoors. The attending veterinarian diagnosed chronic
laminitis, sole penetration and calcification of the lateral
cartilages. The deep rasp marks and the huge flattened area were
still visible in the sole in front of the frog! This work was
done in preparation for a "corrective" shoe. The collateral
groove depth at the apex was zero, and the groove depth at the
back of the foot was 1-3/4". The conditions here should be
immediately obvious to the educated naked eye, but I've seen
this too many hundreds of times to count. Why do so few notice?
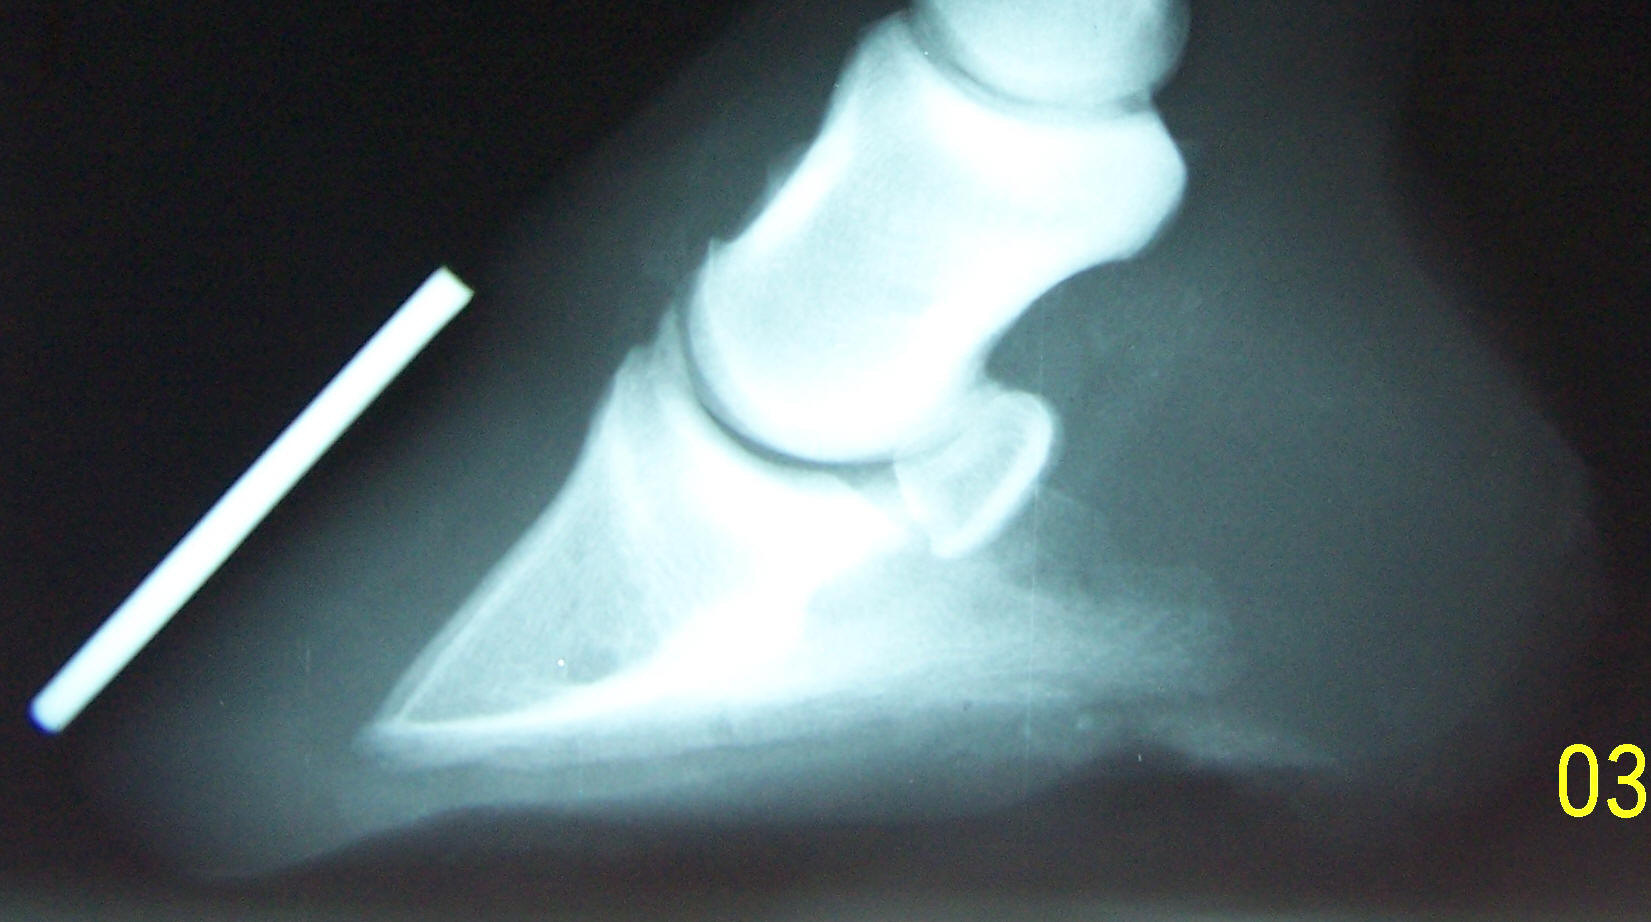
The above right radiograph was taken six months later. I simply
allowed the horse to build adequate sole thickness under P3,
grew in a [more] attached toe wall, and kept the heels 1/16"
above the sole plane. This restored 100% soundness and usability
to the horse.
I try very hard not
to point fingers at the previous farrier on cases like this. It
would just come across as "putting down the competition" and I
would probably spend my life as a witness in courtrooms or get
beaten to death by an angry farrier, so I skillfully sidestep
questions from veterinarians and owners about the real causes of
these problems to keep peace. It makes my life easier, but I'll
probably eventually go to hell for that dishonesty.
While barefoot
trimmers are usually not guilty of sole abuse at the toe, many
of them are very guilty of having the same misunderstanding at
the back of the foot. Like the coffin bone at the toe, the
sensitive structures at the back of the foot can prolapse, or
move downward relative to the coronet. Many trimmers try to get
the heels and bars trimmed into “wild horse parameters” based on
measurements from the hairline too quickly and thin the sole at
the back of the foot. The results are sensitivity, sole bruising
and then abscessing. The sole is designed to bear the horse, but
only if it is well callused and naturally thick.
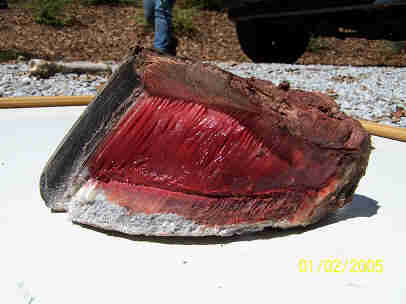
In the photos above,
the left pictures are of the setup trim, and the right pictures
are post-trim, four months later. The sole has built so much
depth and concavity because it was completely left alone during
this process. I was treating the horse for very thin soles and
separated laminae. Notice that at the setup trim, the collateral
groove at the apex of the frog is only about 1/8" deep and the
sole in front of the frog goes flat. It should be obvious by
this that the sole under P3 is very thin. Four months later, the
sole has thickened, placing the collateral groove 1/2-inch deep
at the apex of the frog and solar concavity has built in to
mirror the shape of the bone. All of the white line separation
has grown out, with the exception of a small bit remaining at
the toe. Read
http://www.hoofrehab.com/Coronet.html.
Now look at the
heels and bars. Early in my career, I was taught to view these
bars as being "laid over" or bent, and to trim the bar and sole
together to straighten them. Now, however, I see the flat area
in the sole at the back of the foot as an indication that the
sole is too thin in that spot. The bar is not laid over, but is
chopped off too short because of this missing solar depth. Over
the next four months, I simply let this sole build, keeping the
bar and heel wall lowered to the height of the sole. When the
sole built to adequate depth, the bars follow the resulting
natural concavity and straighten themselves. Read
When I used to trim
this concavity, rather than building it, my horses were less
sound and their soles were much flatter. In four weeks’ time,
the flat spot would return, and I would trim it again. Was I
seeing success with hoof rehabilitation and with barefoot
performance horses? Yes I was, but I had no idea at the time how
much better things could be. Now, in hindsight, it's easy to see
why.
Another common
failure of barefoot trimmers is inadequate boot use. It is
important to understand that horses with less than 5/8-inch of
well-callused sole at any spot on the foot simply don’t have
enough armor for safely carrying the weight of a rider over hard
or rocky terrain. Use boots with padded insoles until adequate
sole has been grown.
Whether it is a
shoer thinning the sole at the toe or a barefoot trimmer
thinning the sole at the back of the foot, the result is sole
sensitivity and bruising of the solar corium. This bruising
often causes sub-solar abscesses and leads to P3 remodeling and
permanent corium damage (a reduced capacity to grow sole). Hoof
managers must realize this because sole sensitivity and
sub-solar abscesses in horses with adequate sole thickness and
callus are about as common as white horses that won’t roll in
the mud. Using the collateral grooves as the
guide will keep you out of this trouble.
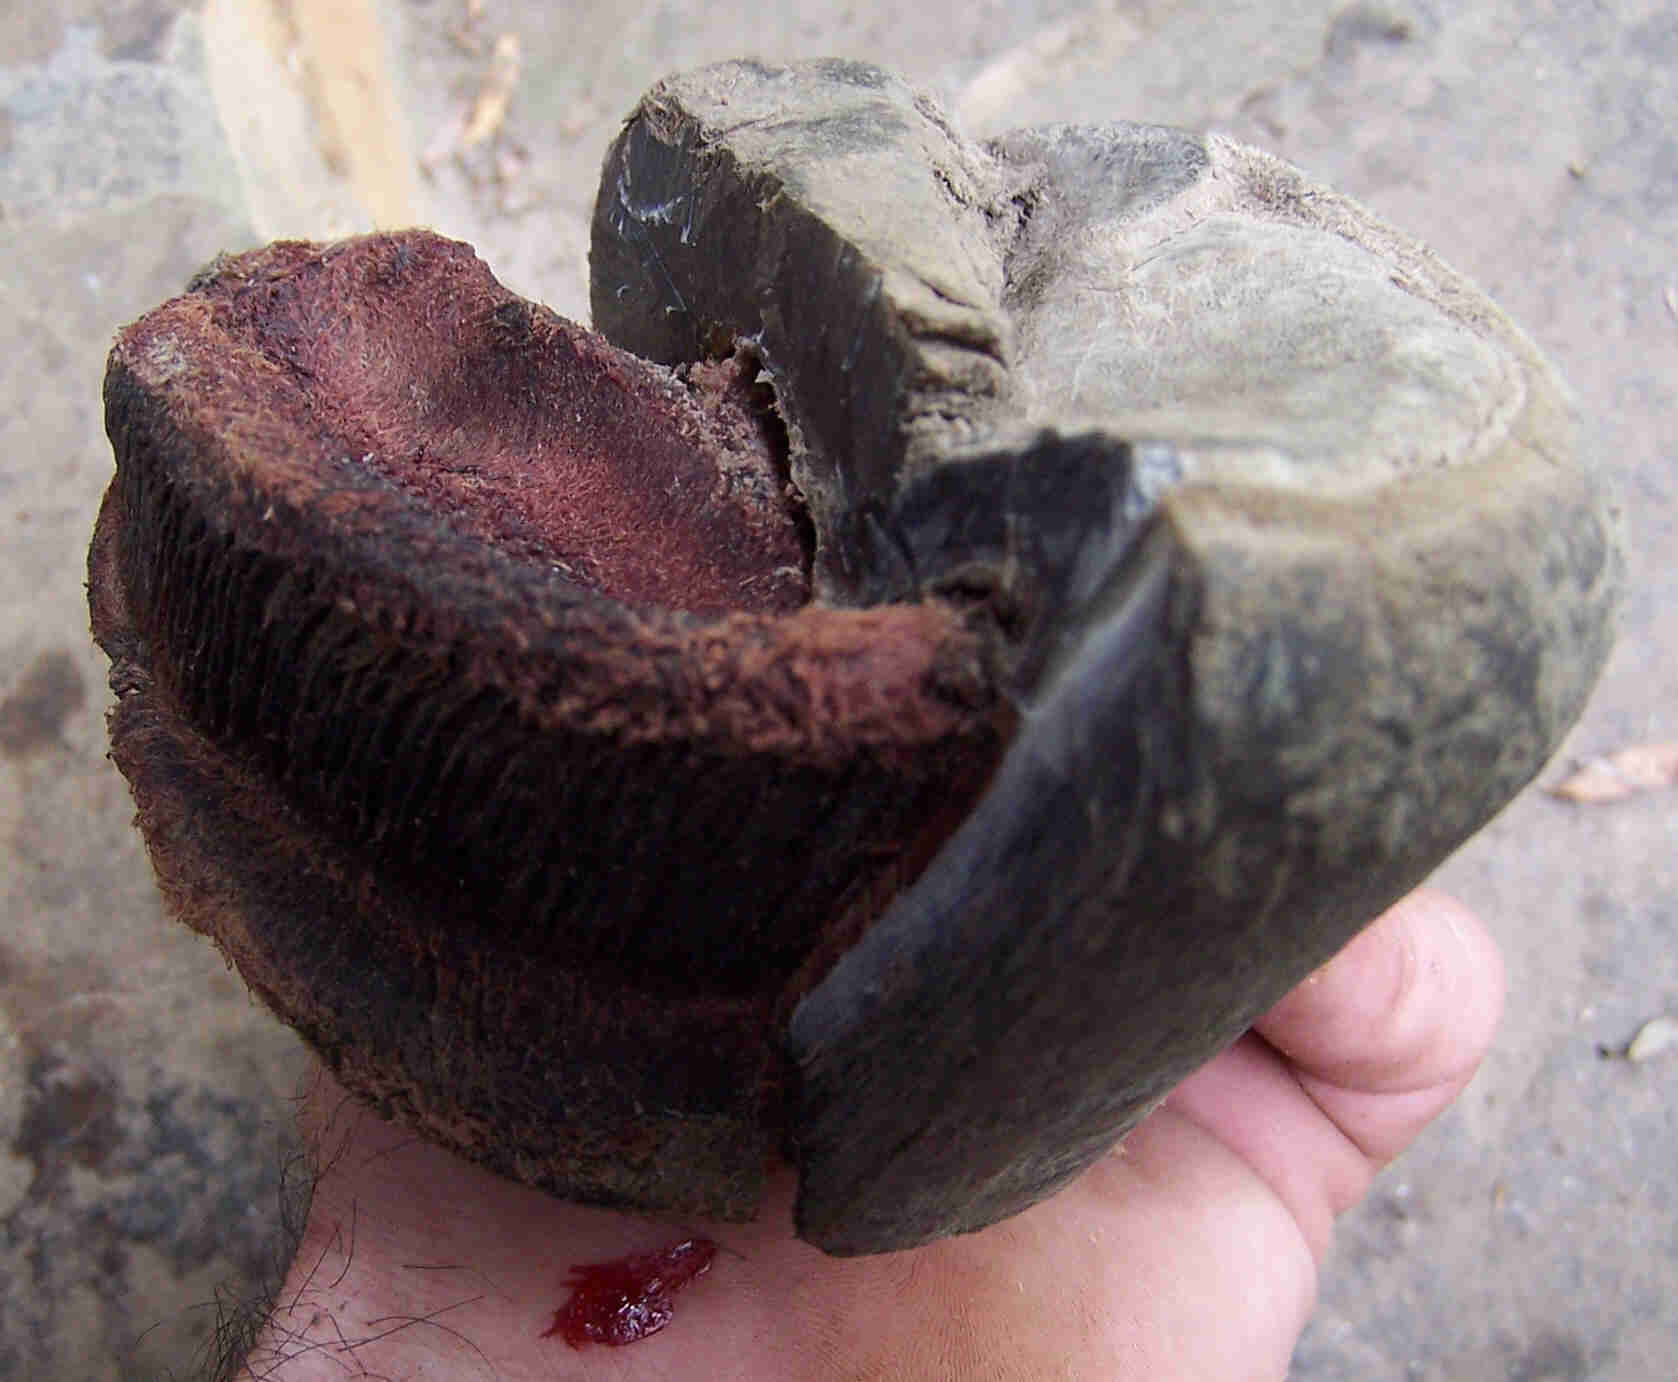
The same working
knowledge of the collateral grooves will also tell you when it’s
time to get very aggressive with the sole. The collateral groove
in the donkey hoof above is 1- 1/2" deep. We can very safely
create the "natural bowl" of solar concavity, dramatically
reducing this excess. In this case, I am keeping my nippers
¾-inch away from the bottom of the collateral grooves at all
times. After this one-time, large reduction, you should watch
for the natural shape of the individual's callusing to emerge
and trust that shape, rather than the "experienced guess" you
started with. The collateral groves at the back of this foot
show you that the sensitive structures have migrated downward,
and trimming these heels into "wild horse parameters" would
actually cause you to make the grooves too shallow and even cut
the lateral cartilages, in this particular case. The sole at the
back of this foot must be preserved to drive them upward.
The pictures above
demonstrate the information the collateral grooves have to
offer. The first picture is before the setup trim. The horse was
diagnosed with navicular disease and with a coffin bone rotation
over 20 degrees. The second picture is the same hoof eight
months later, and before a six week maintenance trim; sound and
working for a living. The sole was not trimmed at any time
during this process.
The collateral
grooves at the setup trim are 1/16 inch deep at the apex of the
frog and 1" deep at the back of the foot. The wide distance from
the from the collateral groove at the back of the foot to the
hairline shows that the lateral cartilages have migrated
downward and these heels cannot be significantly lowered without
thinning the sole and robbing the horse of necessary protection.
At the apex of the
frog, the shallow groove and the flat area of sole in front show
us that the coffin bone is very close to the outdoors. In fact
you can clearly see its imprint on the sole, with a significant
lamellar wedge between the sole and the wall. Using this
information and judging the severely long hoof capsule, we know
the coffin bone and lateral cartilages have migrated downward in
the hoof capsule (or more accurately, the coronet has migrated
up the limb). If we cut the hoof into "natural parameters"
measuring heel and toe length from the hairline, we would trim
the coffin bone itself – rasping the coffin bone is bad.
Instead, I just
trimmed the heels, quarter walls and bars to 1/16" longer than
the healthy sole and relieved the pressure on the disconnected
toe walls. Eight months later, the apex of the frog is buried
nicely into 5/8" of solar concavity. The collateral groove at
the back of the foot is 7/8" deep (after trimming the walls to
1/16" longer than the sole). There is adequate callused sole
everywhere.
Additionally,
this callused sole has driven the inner structures much higher
in the hoof capsule; dramatically shortening the hoof. The toe
wall is much shorter, and the collateral groove at the back of
the foot is now above the hairline. In other words, the coronet
and the rest of the hoof capsule has migrated over an inch down
the skeleton, into a more natural position relative to P3 and
the lateral cartilages. The result is a naturally short heel and
toe, with adequate solar concavity and thickness along the way.
It was comfort, proper movement and the growth of a well
attached hoof wall that shortened this hoof capsule, not the
knife or rasp.
There have been too
many methods and measurements applied to the hoof to possibly
count. This may just sound like one more in a long list. I
assure you though, that nothing is more important to the
soundness and hoof function of the horse than natural sole
thickness. If you doubt this, try rasping a little sole off of
your own foot; just a little bit every four weeks will do the
trick. Study the wild hooves and get an image in your mind of
the shape of the soles and particularly, the height of the
collateral grooves from the ground. The wild hoof below has a
wire placed in the bottom of the collateral groove to help you
visualize this on the radiograph.

If you make sure
your horses' collateral grooves are a natural height off the
ground, you will be amazed by their soundness and by your own
ability to fix and prevent hoof problems. Nature was kind to the
horse to provide such an accurate guide for us to follow. As
usual, we just need to learn to listen.
Added in 2018:
Since the collateral grooves tend to be 7/16” (9mm) away from
the corium, if you concave the sole all the way to the bottom of
the collateral groove around the apex of the frog, you will have
cut the sole too thin (right side of drawing). In order for the
entire sole to be of adequate (5/8”-15mm) thickness (much needed
for safety and soundness), there needs to be a 1/4-3/8” (6-9mm) verticle
dropoff into the collateral grooves adjacent to the frog
(left side of drawing). Note that the collateral groove
heights-off-the-ground are the same on both sides, but the left
side has a much thicker sole.
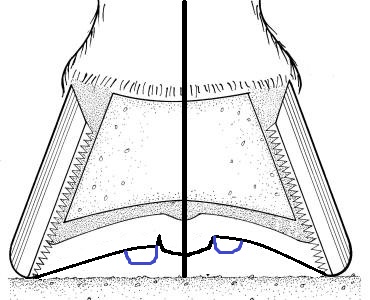
The same
reasoning is important when considering the sole ridges that
tend to pop up along the sides of the frog. On the right side of
the photo (with the excessively thin sole), the sole ridge
(blue) is simply the horse growing adequate
sole thickness in that spot – leave it alone, and hope that
adequate thickness spreads to the rest of the sole. Look for
that 1/4” dropoff into the collateral groove. On the left
side of the photo, there is a 1/2” dropoff into the
collateral groove – this ridge of sole has formed on top of an
adequately thick sole. It might be appropriate to trim this
ridge off so that the dropoff is only 1/4” deep, though do
consider that it might also be a terrain adaption (See the
article
http://www.hoofrehab.com/Seasons.html).