Heel Height: The Deciding Factor 10-13-05 (with 2018 edits) Pete Ramey
Note: If you are new to hooves
and the terminology used here, as a prerequisite, read the
12-article series
http://www.hoofrehab.com/HorsebackMagazineArticles..html
. Written for lay horse owners, these
Q&A-style articles provide a good introduction to hoof care and
rehab.
When horses are in
motion, it is important that they impact with the feet flat with
the ground at the walk. At faster gaits, including a fast,
animated walk, they should land distinctly on their heels.
Almost every energy dissipating feature of the foot requires
this use of the back of the foot to function properly.
The horses' primary energy
dissipaters – the frogs, digital cushions, lateral cartilages,
the bars and the cushioned design of the solar corium are
pretty-much out of function if the horse is carrying its weight
on the toes.
Toe-first impacts
are not always the bad guy, though. Horses use them to negotiate
slick terrain, to accelerate, and to go uphill. The big problems seem to occur –
navicular damage, tendon damage, ligament damage, lamellar
separation, P3 remodeling, solar corium damage, joint problems,
the list goes on – when toe-first is the predominant or only way
the horse moves. In addition to these local problems with
toe-first impact, this compensative movement pattern wreaks
havoc with the entire locomotion system of the horse, often
causing a wide range of issues from teeth to tail.
Domestic horses tend
not to get enough movement and heel-first impact to develop the
lateral cartilages, the digital cushions and frogs into the
strong, shock absorbing tissues they would have become if the
horse was running wild. This soft tissue is supposed to make up
around 60% of the total mass of the hoof capsule if fully
developed (Robert Bowker, VMD). Instead, in many domestic
horses, this tissue is a fraction of the mass and density it
would be in a healthy state because the caudal foot has not done
enough work required to achieve healthy development. The soft
terrain that our foals are raised in, little reason to move more
than a mile or so per day, plus traditions of failing to
routinely trim foal hooves each contribute to this common lack
of internal foot development we see in domestic horses. Failure
to trim is the easiest of these pitfalls to avoid. It doesn’t
seem to matter how much a horse moves – if the frog is lifted
off the ground by excess wall growth, the caudal foot will
become atrophied and over-sensitive.
The result is that
most domestic horses are wimps when it comes to slamming the
back of the foot into hard ground at impact as nature intended.
Given the cost of what this can mean to the horse, one of our
primary roles as hoof care providers is to ensure that the horse
can land heel-first in its turnout environment and in the riding
environment. This is the key to developing a more robust caudal
foot, and is also a primary key to healthy lamellar attachment
and sole thickness at the toe.
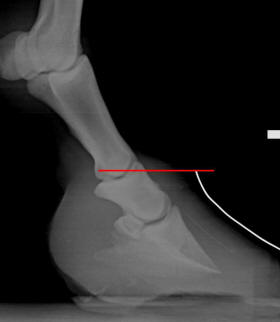
A lot of us were
trained to set heel height based on achieving certain palmar
angles. I, like most practitioners, believe that a 3-5 degree
(positive – higher in back) palmar angle is natural for most
horses. But the smart practitioner will understand that horses
do not wreck themselves, or heal themselves, while standing
still on the radiograph block. Indeed they wreck themselves and
they heal themselves while moving, right? So why prioritize the
way the horse stands?
In many horses, if
there is inadequate internal foot development, tight flexor
muscles, or perhaps just a painful case of thrush, if you lower
the heels until the horse has a 5 degree palmar angle, while
standing on the radiograph block or trimming mat, he will just
land on his toes (or side load) to avoid pain when asked to
move. Understand that this may mean that they stand around with
a 5 degree palmar angle but impact the ground at a 25 degree
palmar angle in motion. These should be
frightful mechanics in anyone’s book, as it rips the horse
apart.
So what if, instead,
you were careful not to lower the heels so much that the horse
needed to toe-load. The idea is not to lift the frog off the
ground, but instead to relieve some of the pressure on the frog
as the heels sink into the ground – to reduce the frog pressure
down to an amount that the horse can actually bear. Can you
imagine a scenario, that then, while you might leave the horse
standing around with a 15 degree palmar angle on a hard surface,
that the resulting heel-first movement would yield a ground
parallel P3 at impact? This should be much better mechanics in
anyone’s book.
Heel height (and
thus palmar angle) should be thought of and addressed in motion,
not on the trimming mat or radiograph block. Rule #1:
Trim the heels as
low as possible without causing compensative toe-first impact.
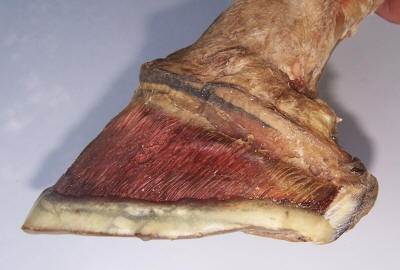
Sole Thickness
When you peel the
hoof walls off a cadaver as in Figure 1, a few things become
clear. The coffin bone (P3), forming the foundation of the front
half of the foot and the lateral cartilages forming the
foundation for the back half of the foot hook together in an
arched shape when viewed from the side. It is the front half of
this arch that gives P3 its positive palmar angle, and this arch
should probably press out flat at peak impact loads under spring
tension – absorbing shock and springing the horse into the next
stride. When the lateral cartilages are weak or under-developed,
this arch has a “flat tire,” leading to zero degree palmar
angles. To reverse this, again, put the back of the foot to
work, thus developing the strength and integrity of the lateral
cartilages and thus creating the coiled spring this tissue is
supposed to form.
Covering the bottom
of this foundation should be a springy, hydraulically dampened
solar corium and a heavily callused sole that is uniformly
5/8”-3/4” (15-18mm)-thick. This is the one non-negotiable part
of hoof health. If the sole is compromised (most often by
routine trimming, sometimes by excess wear, nutritional or
disease/health issues), internal destruction will follow. This
leads to another finite rule #2 for heel height:
Do not thin the
sole beyond its 5/8”-3/4” (15-18mm) natural thickness.
But…
there are a number of horses that do callus at around 1/2"
(12mm) sole thickness and the sole will not get any thicker.
These horses tend to do fine, and you shouldn’t worry much about
them. But don’t take this to mean it is okay to trim thicker
soles down to 1/2" thickness – it is not. Doing so removes
important external callusing, and there is a huge difference
between 1/2" of callused sole and a 1/2" of raw,
freshly-trimmed, uncallused sole. The latter is providing a
fraction of the protection.
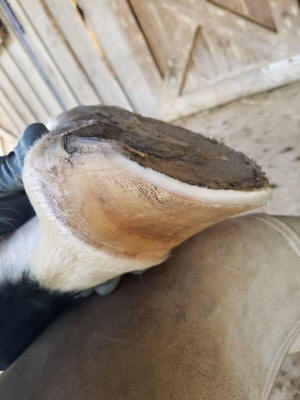
Hoof Wall Growing Past the Sole
Another variable
that affects heel height is how much heel wall you allow to
remain standing proud of the sole plane. Some horses do well
with the heel wall trimmed almost down to the level of the sole
plane. Others will go better if you leave 1/4" (6mm) of wall,
sometimes more, standing longer than the sole plane. This will
vary with terrain, plus internal and external frog health and
should be considered while watching the horse move in its
turnout and riding environments.
If a horse is moving
toe-first in the turnout environment (I tend to boot/pad these
compromised horses for the riding environment), I keep letting
the heel walls grow longer past the sole until, 1) heel-first
landing is achieved, or 2) the heels try to distort (roll under,
crush or under-run). I do know a trick to largely prevent this
distortion (see figures 2 and 3). Meanwhile I am simultaneously
doing everything I can to allow the horse to be able to bear
more caudal foot pressure: treating any infections in the frogs,
preserving frog callus at trims, riding or exercising often in
boots with padded insoles to develop the internal structures,
providing deep beds of pea gravel in loafing areas (also to
develop the internal foot and to callus the sole and frog).
Over time, as the
internal foot strengthens, I usually end up trimming the heel
walls almost to the level of the callused sole plane. But the
path to that point usually involves leaving the heels longer for
a while, as heel-first impact in the turnout environment is one
of the major factors involved in bringing a foot to that level
of health internally.
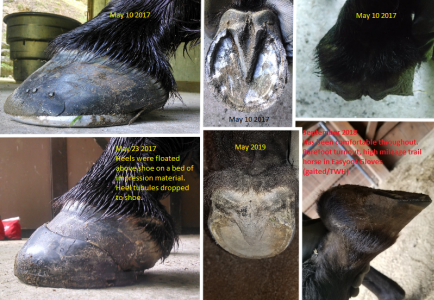
Figures 2 and 3
When the frog is
weak and a longer heel height is needed to allow heel-first
impact, I allow the walls to grow longer at the bar/wall
junction only. Taper the bars up to this higher point as well
(to provide a “brace” or strength to this area), then rocker the
heel wall behind the bar/wall junction. This will allow you to
build as much as 1/2" (12mm) of extra wall height at the
bar/wall junction (even on hooves that want to under-run or fold
underneath the horse) without distortion. You can bring
weight-bearing back to normal proportions without sacrificing
vertical height (Figures 2 and 3).
If this looks
strange to you, it is probably because you are still thinking of
horses’ hooves standing still. When you think of horse hooves in
motion and landing heel-first, this trim starts to make more
sense. I use this method to reverse under-run heels (sometimes
it works in minutes as the now unsupported bent tubules drop
toward the ground), but also do a similar rocker on club feet to
encourage stride lengthening and stretching of the limb.
This is a powerful
tool to both encourage and allow heel-first impact and comfort.
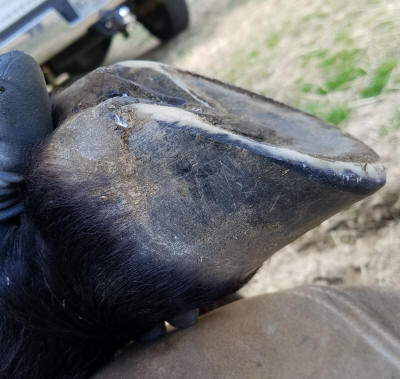
Figure 4
Previous chronic
toe-walker with trim now yielding comfort and correct movement.
The heels have been allowed to grow longer at the bar/wall
junction, but then were rockered behind that point. This both
sets the hooves up to receive heel-first impact while providing
the extra protection needed for this horse to bear pressure on
the weak frogs and digital cushions. In a nutshell, it allows
you to build extra heel height without allowing the heels to
migrate forward.
Flexion, Stance, and Movement
When deciding on the
heel height to set up on an individual horse it is also
important to consider the current flexion, stance and movement
of the horse. This should be a big factor for all horses, but is
particularly critical for horses with hoof capsule rotation and
with club feet.
If you walk up to a
horse with hoof capsule rotation and an elevated palmar angle
(Figure 5), always visualize the healthy foot the horse needs to
grow around the existing P3 and lateral cartilages (dashed
line). In some cases, it is the right thing to do to immediately
trim the heels similar to the dashed line on day #1 (this would
be done by trimming the heels more parallel to the ground plane
of the collateral grooves). In other cases, lowering the heels
at all would be devastating to the horse and actually cause
toe-first compensation, probably making the rotation worse.
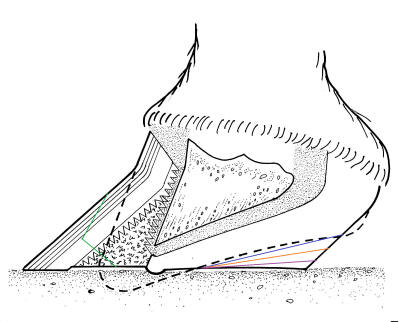
Figure 5
For discussion
of treatment of the toes (green line) in order to grow
well-connected walls/laminae (dashed line) and the nutritional
factors, read
http://www.hoofrehab.com/Breakover.html and
http://www.hoofrehab.com/Diet.html
. The most
important factor, though, is usually the heel work we are
discussing right here.
In extreme cases, as
an involuntary reaction to foot pain, the flexor muscles often
knot up or cramp, holding the flexor tendons in an extreme state
of tension. We call this condition wind-up. In less
extreme cases, the horse can simply be stiff all over from the
pain and lack of movement. Other times, the palmar angle/heels
have simply been high, long-term, and joints, ligaments, tendons
and muscles have adapted to it. The list goes on, but for this
conversation, understand that it is a mistake to lower the heels
to “normal” on some horses. Sometimes this is very temporary,
sometimes it is permanent (thus club feet belong in the same
conversation).
To sort through what
is right to do to a given foot on a given day, I do a series of
evaluations:
·
Observe the stance.
If the horse prefers to stand with the limbs vertical or
slightly back, I tend to be more conservative with heel trimming
(purple line). If the horse prefers to stand with the limbs out
front with weight rocked back on the heels, I would lean towards
a more aggressive approach (blue line, or perhaps orange line if
the frog was also weak or infected and sensitive).
·
At the walk, I look
for similar: If the gait is stiff, short, upright, I would lean
towards a trim similar to the purple line. If the horse carries
the limbs out front and heel loading in yielding terrain, I
would lean toward trimming to the blue line.
·
Offer a forward
stretch of the front limbs. Don’t pull on the limb – simply
bring the foot low and forward as if onto a hoof stand. If the
horse readily straightens the carpus (often called the knee),
and bears down pressure on the straightened limb, enjoying the
good stretch, it is showing you there is definitely flexor
muscle laxity and limb mobility to accommodate a trim to the
blue line. If, instead, the horse resists straightening the
carpus and is slow or refuses to engage in the stretch offered,
I tend to leave the heels alone or trim to the purple line. I
then recommend veterinary evaluation of the limbs, routine
stretching by the owner, professional sports massage/stretching,
and therapeutic exercise.
·
Subjectively evaluate
the frog and digital cushion integrity – how tough is the caudal
foot and how much pressure can this frog bear? If you dump a
horse down onto a weak, thrush-infected frog, he will simply
toe-load (or side-load), which will prevent you from growing out
the rotation and keep you from improving the caudal foot health.
This alone causes me to do a lot of trims at the purple or
orange lines, particularly when the horses are new to my care.
Combine all of these factors into your decisions with comfort and flat/heel-first impacts in the turnout environment as the top priority. Then be critical of the result, always adapting with the current status of the horse. Use boots, pads, glue-ons, etc. if the trim alone fails in achieving the movement goals. See http://www.hoofrehab.com/GloveMod.html for instructions.
Negative Plantar Angles
In hind feet, we often see the opposite problem. The plantar angle may present as ground-parallel or even a negative angle (P3 higher in front than in the back). Unless this was just a blatant trimming error (excess sole thickness left at the toe or excess sole thinning at the heels), this hoof form is generally caused by an incomplete or too-forward hind stride - the hind limbs reach too far forward and/or do not extend far enough behind the horse during locomotion. The list of potential causes for this type of movement is long: compensation for front foot pain, too much stall time with associated general muscle stiffness, inadequate warm-up prior to work, saddle fit issues, rider balance issues, dental issues, unnatural training practices (think big lick training of walking horses or false collection that does not include a rounded back), plus a host of potential injuries to the back, hips, limbs, etc.
Therefore, when faced with a zero or negative plantar angle case, you need to use lateral radiographs and the collateral groove depths (discussed below) to determine if there is excess sole thickness at the toe that needs to be removed, but you also need to get to work trying to find and treat the true underlying cause(s) of the movement pattern that actually caused the problem. I typically request a veterinary exam, plus an evaluation by a sports massage therapist. If there is no injury that makes it contraindicated, daily stretching by the owner, plus cavaletti work and light hill work helps these horses more consistently than any other treatment I have seen.
Heel wedging is often recommended for these horses. If a heel wedge immediately corrects the short or forward hind stride, it is a good thing - this correct movement will ultimately correct the plantar angles and the growth pattern of the foot over time. If, however, the horse continues the same movement pattern after the heels are wedged up, the wedges become dangerous and are not recommended, as they are only serving to increase the stress to the extensor tendons, joints, ligaments, etc.
Hoof/Pastern Axis (HPA)
It is common for
people to believe that heel height should be set based on
aligning the standing hoof/pastern axis (HPA). While I do notice
HPA, it does not factor into my heel height decisions – at
all. To me, the palmar angle and the current position of
the pastern are best treated as separate subjects. Horses with
toe pain tend to lean back, lowering the pastern angle. Horses
with heel pain tend to lean forward, raising the pastern angle.
Horses often have different pastern angles standing alone vs.
standing with a rider on their backs. A horse at rest will
constantly shift the pastern angle up and down. At best, a
straight HPA is a moving target.
Overall, though, I
view setting heel height to correct HPA as one more method that
prioritizes static (standing) mechanics over the dynamic (in
motion) mechanics. I prioritize the way the horse moves over the
way the horse stands in every decision I make. That said, almost
every horse in my care ends up with the HPA in alignment, so
perhaps I am often getting similar information from the dynamic
mechanics that others are getting from the static mechanics.
Measuring From the Highly Mobile Coronet?
One of the most
common and serious problems afflicting horses today is the
routine removal of sole done by a majority of hoof
practitioners. One reason for this is generally because people
are trained to measure hoof length from the coronet/hairline.
The coronet is highly mobile, relative to P3 and the lateral
cartilages, creating massive error involved in making foot
length (heel or toe) decisions based on these measurements, or
in equally common subjective decisions, as in, “That foot looks
too long so I’ll cut it shorter,” etc.
This has thankfully
become more widely understood at the toe, since practitioners
can see it every day in lateral radiographs by evaluating CE and
sole thickness. But it is less commonly understood that the same
thing is happening in the back of the foot – the coronet can be
significantly displaced relative to the lateral cartilages,
making heel height measurements from the hairline misleading.
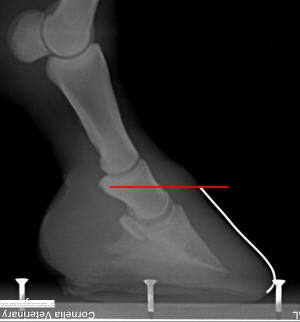
Figures 6 and 7
Left photo of a foot with almost all of P2 buried in the hoof
capsule. Right photo is the same foot – 12 months later – with
approximately a 10mm improvement to CE (coronet to extensor
process – top of coffin bone – measurement). The need for
adequate sole thickness is identical at both moments in time. If
you trim a foot with a 15-18mm CE (as in the left photo) to
“normal” proportions or toe length, the result would be the
total removal of the sole.
The more accurate
way to measure foot length at the heel or toe is to measure or
estimate how much sole is covering the internal structures.
Where the hairline is currently residing on the limb is an
important, but totally separate subject. See
http://www.hoofrehab.com/DistalDescent.htm
and
for an enlightening internal view of this, read
http://www.hoofrehab.com/Coronet.html.
The most accurate
way to measure sole thickness in the front of the foot is with a
good digital lateral radiograph. As a secondary method with
considerable accuracy when properly applied, you can use the
collateral groove heights off the ground (Figure 8) (see
http://www.hoofrehab.com/HorsesSole.html
for details). In most horses (without
P3 remodeling), if there is adequate sole thickness covering the
outer periphery of P3, the collateral groove at the apex of the
frog will be supported 1/2" to 5/8” (12-15mm) off the ground by
that outer periphery of sole (plus any wall height standing
longer than the sole).
These measurements
have their own nuances and exceptions, but overall are far more
accurate than measuring from the coronet.
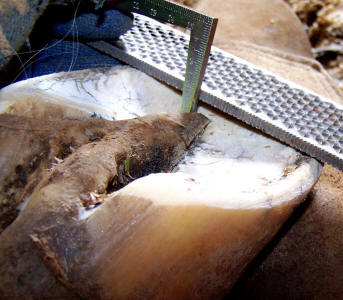
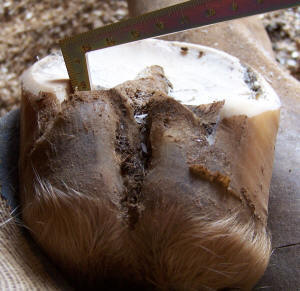
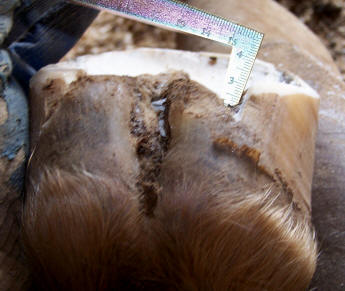
Figure 8
At the back of the
foot, radiographs are of little use for determining sole
thickness, as we generally cannot see the lateral cartilages or
the corium on radiographs; so the collateral grooves become even
more important for ensuring that post-trim, there is adequate
sole thickness left and to keep us from being fooled by a
vertically displaced coronet.
Again, there are
variables discussed in other the articles, but most horses with
adequate sole thickness in the back of the foot have collateral
grooves – measured at the deepest point beside the bars – that
are 1” to 1-1/4” (25-30mm) off the ground (See Figures 9 and
10).
Figures 9 and 10
Once you are aware
of heel height in terms of how high the palmar processes and
lateral cartilages are being supported off the ground and/or
simply, how much sole is covering the bottom of these
internal structures, you will immediately start to see the
great range of coronet heights off the ground that are presented
with normal heel height internally. The hairline location
(vertically) really has nothing to do with heel height.
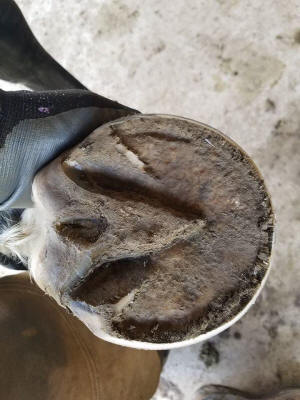
Collateral Grooves and Trimming the Heels Parallel to the Internal Structures
The collateral
grooves can also be used to determine the angles and location of
the internal structures within the hoof capsule and guide you in
trimming more parallel to them. In figure 11, if you lowered the
heels in a straight plane from toe to heel (red line), it would
cause you to excessively thin the already too-thin sole at the
toe.Trimming or shoeing on this plane would also perpetuate the
rotated hoof capsule.
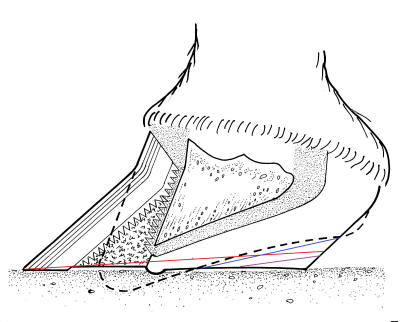
Figure 11
To accomplish this is in the field, hold the rasp “tipped up away from the toe” more parallel to the ground plane of the collateral grooves, rasping the corner of the heel. For example, the Figure 11 drawing would likely have a starting collateral groove depth of 1/8” (3mm) at the apex of the frog and 1-3/4” (43mm) at the deepest point beside the bars.
If, instead, you
chose to trim to the blue line, you would float the rasp above
the toe so that the collateral groove at the apex of the frog is
about 1” (25mm) away from the rasp as you trim the heels down to
perhaps a 1-1/4” (30mm) collateral groove height at the deepest
point beside the bars (or stop the trimming before you would
start to thin the sole that is already the correct thickness,
usually at the widest point of the foot). The bars would then
need to be tapered so that they had at least 1/4" of concavity
or relief at the ends, depending on terrain – usually – Read
http://www.hoofrehab.com/TheBars.htm
and
http://www.hoofrehab.com/Seasons.html
for details.
Change
Every one of the
variables discussed here can and will change over time.
Therefore, it is important that you re-evaluate each one of them
at each trim to keep the heel height optimized at all times.
Generally speaking, to combine the rules from above, we want the
heels as low as possible, without, 1) Causing toe-first
compensation or lameness, or 2) thinning the sole beyond its
normal
5/8” (15mm) callused thickness. We also never want to lower the
palmar angle below 3 degrees or over-stress a compromised limb.
Aside from watching the horse move, also teach clients to look
for compensative movement and report it to you so you can adapt
and adjust. More importantly, look at the wear pattern – look
for excess wear at the toe and inadequate wear at the heels –
this can tell you a lot about how the horse has been moving
throughout the trim cycle and give important clues about
adjustments you should make with the trim.

Figure 12
This foot has
been loading uniformly throughout a 6-week trim cycle – flat at
the walk and heel-first at the trot in the home environment. No
major changes are needed to the heel height – just a routine
trim, uniformly removing 1/8” (3mm) or so of excess wall and
heel height and then a roll or bevel on the walls.
Figure 13
This is the wear
pattern of a horse that has been compensating by overloading the
toes. The front of the sole is worn flat and the wall is worn to
the level of the sole. Perhaps the heels were over-trimmed at
the last visit? Perhaps they should be left longer this trim?
And rockered? Or maybe the horse needs thrush treatment. Perhaps
the limbs are stiff and in need of stretching, warmup, or more
exercise in general? Maybe the horse moves just fine in its
turnout environment but needs boots/pads during riding. Think.
Adapt. Break this Pattern.
All photos are from
Pete Ramey’s files or from the book Care and Rehabilitation of
the Equine Foot. Black and white line drawings by Karen Sullivan
– color graffiti added to them by Pete.
*
*